
TL;DR
Moving your rig into a closet or behind a barrier reduces noise more than foam alone. Proper placement, sealing gaps, and ventilation are key. A well-treated closet can become a quiet, professional-sounding space for recording or streaming.
Ever notice how a tiny closet can turn into a surprisingly good vocal booth with the right tweaks? Most people think soundproofing is about endless foam and thick walls, but the real game-changer is where and how you place your gear. You can silence a noisy rig and improve your recordings without blowing your budget or sacrificing closet space.
This guide will show you how to turn your closet into a focused, quiet zone. You’ll learn why placement beats treatment, how to seal leaks, and the secrets to making your small space sound bigger and better.
Acoustic dampening
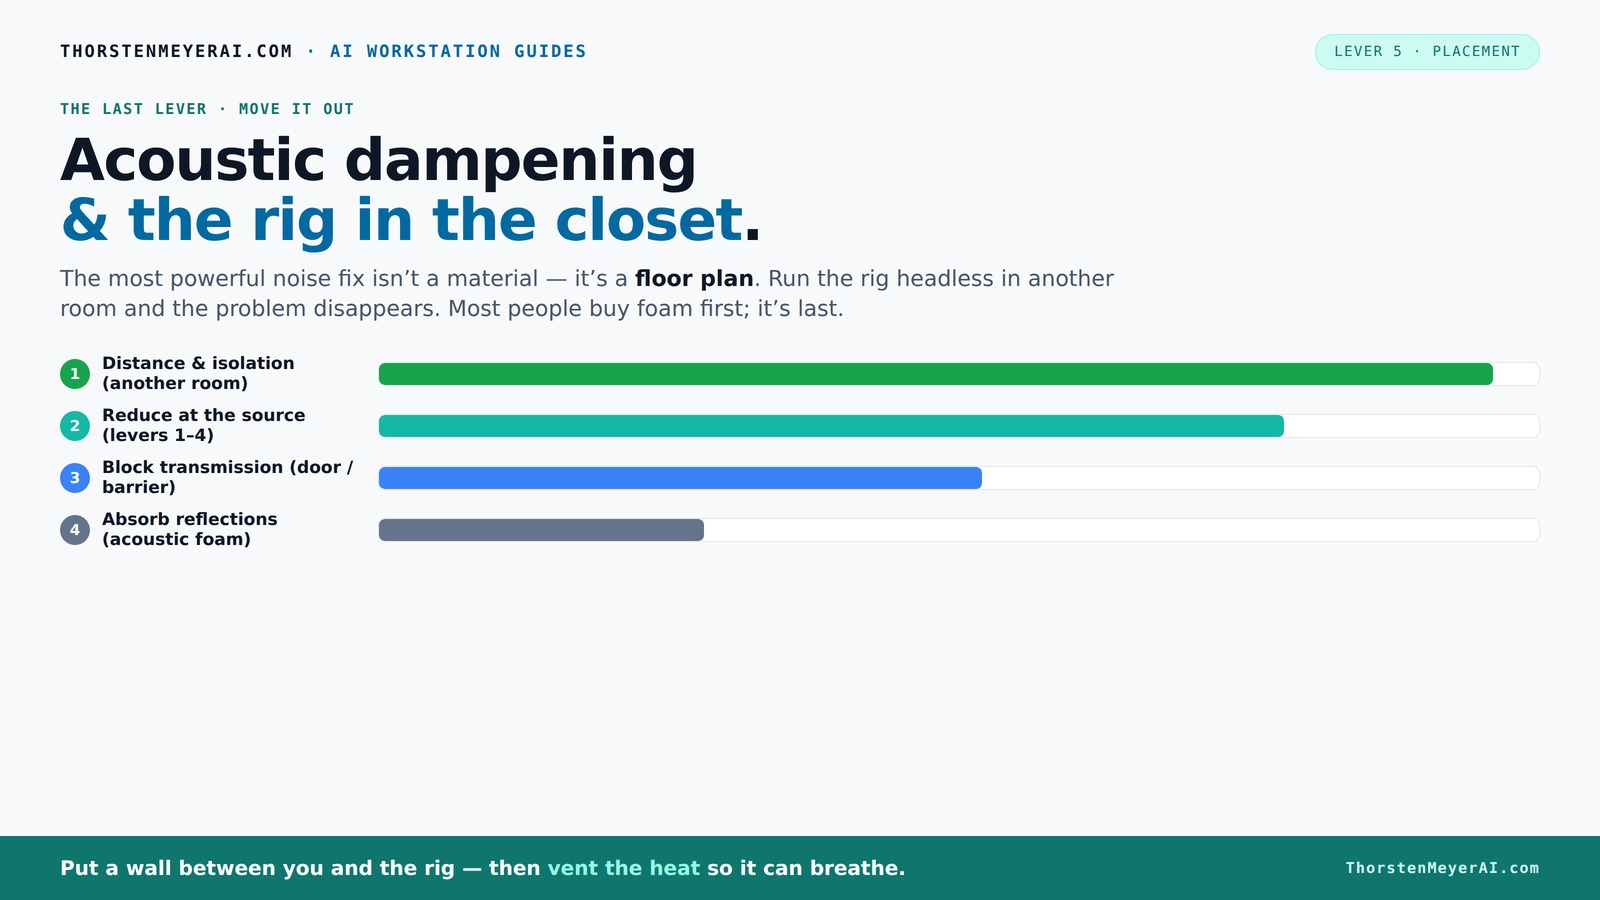
& the rig in the closet.
The most powerful noise fix isn’t a material — it’s a floor plan. A rig you can’t hear because it’s in another room beats any amount of foam. Tap the approaches in Part 1 to see what actually works.
(another room)
(levers 1–4)
(door / barrier)
(acoustic foam)
Contain the noise, not the heat
Key Takeaways
- Sealing gaps and using targeted acoustic treatment inside your closet reduces reflections and leakage more than foam alone.
- Position your mic carefully—about six inches away, slightly off-center—and treat reflection points directly behind and beside it.
- Ventilation is crucial—always provide airflow when placing your rig in a closet or sealed space to prevent overheating.
- Corners and low frequencies require specific treatment like bass traps to avoid boomy or boxy sound.
- A closet can be a surprisingly good vocal booth if you focus on sealing, placement, and simple DIY soundproofing tricks.
Why Acoustic Dampening Is Not the Same as Soundproofing — And Why It Matters
Acoustic dampening is about controlling reflections and echo inside a space, not stopping sound from leaking out. Think of it like softening a loud room so it doesn’t bounce back your voice or instrument. When you dampen inside the room, it makes your recordings clearer by reducing reverberations that can muddy your sound. This clarity is crucial, especially in small spaces where sound bounces unpredictably.
Soundproofing, however, aims to prevent sound from escaping the space entirely, which is a much bigger challenge and often requires heavier construction or specialized barriers. For most home setups, focusing on dampening is more practical and effective for improving audio quality. The tradeoff is that while dampening makes your recordings sound better within the space, it doesn’t eliminate noise leaks. Combining both approaches — dampening to improve sound quality and sealing gaps for noise isolation — gives you the best balance for a small closet setup.
Understanding this distinction helps you set realistic expectations. You won’t achieve full soundproofing with foam alone, but you can significantly improve your audio clarity and reduce echo, making your recordings sound more professional.
Why a Closet Can Actually Be a Great Vocal Booth — If You Do It Right
Small, enclosed spaces like closets naturally reduce echo and reverb because their tight walls limit sound reflection. This means less sound bouncing back, which often results in a cleaner, more focused vocal sound. When you optimize a closet, you're essentially creating a controlled environment that can mimic a professional booth—without the expense or space requirements.
However, simply closing yourself in isn't enough. You need to add materials that absorb sound, seal gaps to prevent leakage, and position your gear thoughtfully. For example, blankets and foam can dampen reflections, but sealing gaps around the door prevents outside noise from seeping in and your sound from escaping. The benefit of a well-treated closet is that it can deliver a warm, intimate tone that’s difficult to replicate in a larger, untreated room. The tradeoff is that if you neglect proper sealing or treat only one aspect, you might still face echo or leakage issues. The key is understanding the interaction between space, materials, and placement to get the best results from a small closet.
Where to Position Your Mic and Panels for Best Effect in a Small Closet
Placement is critical because in a tiny space, reflections and resonances happen rapidly and can distort your sound. Positioning your mic about six inches to a foot away from your mouth minimizes proximity effects and helps you capture a clear, direct sound. Slightly off-center positioning reduces plosive sounds and prevents the mic from picking up unwanted breath noises. But equally important is where you place your acoustic treatment.
Target reflection points—these are spots on the wall where sound waves bounce directly back to the mic. For example, placing panels behind and beside your mic—especially at the points where sound from your voice hits the wall—interrupts these reflections. This targeted approach prevents echo and reverb from muddying your recordings. Using a soft surface like a blanket over the desk can absorb reflections from hard surfaces, but it’s most effective when placed at these reflection points. The tradeoff here is that over-treating can deaden the sound or make it too dry; the goal is to balance absorption with natural sound. Proper placement of your mic and panels ensures your voice remains warm and clear, rather than hollow or distant.
How to Seal Your Closet Door and Reduce Sound Leaks Effectively
The door often represents the biggest challenge in sealing off your closet. Gaps around the frame act like open windows for sound to escape and noise to enter. To address this, use weatherstripping or acoustic sealant around the edges to create a tight barrier. Additionally, hanging a thick blanket or acoustic foam over the door can absorb flutter echoes and further block sound leakage.
For example, sealing gaps with weatherstripping creates a more airtight seal, while hanging a quilt or thick curtain over the door adds mass and damping. These simple DIY fixes significantly reduce sound leaks, making your recordings cleaner and less susceptible to outside noise. Keep in mind, even small cracks or gaps matter—completely sealing them prevents sound from sneaking out or in. The tradeoff is that overly sealing without ventilation can lead to overheating, so consider airflow options as well.
Achieving an airtight seal improves your overall sound isolation, but it’s important to balance sealing with proper ventilation to prevent overheating and maintain comfort during long sessions.
Treating Corners and Low Frequencies — Why Bass Traps Matter in Small Spaces
Corners are critical because low-frequency energy naturally accumulates there, creating boomy or muddy sounds that can ruin a clean vocal or instrument recording. This buildup occurs because sound waves bounce around and concentrate in these areas, especially in small rooms where space constraints prevent low frequencies from dispersing naturally.
Installing bass traps in the corners absorbs these deep sounds before they become problematic. For example, DIY bass traps made from rockwool or thick foam can significantly reduce low-end resonance, resulting in a tighter, more balanced sound. Without this treatment, your recordings might sound hollow or overly boomy, even if your mid and high frequencies are well-controlled. The tradeoff is that neglecting low-frequency treatment in a small space often leads to a “boxy” sound, where the voice or music feels trapped and lacks clarity. Properly addressing these frequencies ensures your sound remains natural and professional.
DIY Tips to Improve Your Closet Booth Without Breaking the Bank
Effective DIY treatment hinges on understanding which surfaces reflect sound and which absorb it. Using thick blankets, moving quilts, or mattresses over reflective surfaces reduces echoes and creates a more controlled environment. Rugs on the floor absorb sound that would otherwise bounce up and create a sense of space that’s too lively. Stacking cushions around your mic stand acts as a buffer, preventing sound from bouncing directly into the mic from hard surfaces.
For example, draping old blankets over a clothes rack or placing a foam mattress against the wall can drastically improve sound quality without expensive equipment. The key is to focus on reflection points—areas directly behind and facing the mic—because these are where echoes originate. Using everyday household items creatively allows you to customize your treatment based on your space and budget, making a noticeable difference in your recordings. Remember, the goal is to reduce unwanted reflections and resonances, not deaden the sound entirely; finding that balance makes your voice sound natural and professional.
Common Mistakes to Avoid When Setting Up a Closet Rig
Many beginners make the mistake of overusing foam or neglecting to seal gaps, which can lead to subpar results. Excessive foam can make the space sound overly dead or boxy, reducing the natural warmth of your voice. Conversely, ignoring gaps around the door or other openings allows outside noise to seep in and your sound to leak out, defeating the purpose of your setup. Additionally, placing the mic too close to a hard surface creates harsh reflections that distort your audio and make it sound unnatural.
For example, a podcaster who only placed foam directly behind the mic without sealing the door experienced echo and noise bleed. When they adjusted placement and sealed gaps, their sound became much clearer and more controlled. It’s essential to test your setup with recordings, listen critically for echoes or leaks, and make incremental adjustments. This iterative process helps you identify and fix issues before they become major problems, ensuring a cleaner, more professional sound.
When a Closet Is Enough — And When You Need a Dedicated Room
If your primary goal is casual voice-over work or streaming, a well-treated closet can be a highly effective, budget-friendly solution. It offers a quick and practical way to improve your audio without extensive renovations. However, for professional music production or serious podcasting, a dedicated room with proper soundproofing, diffusion, and acoustic treatment is often necessary to achieve the desired quality. Small closets can work well for voice, but they have limitations in handling loud music or multiple instruments due to size constraints and potential sound leakage.
For example, a freelancer started with her closet, but as her audience and production needs grew, she invested in a dedicated studio with thicker walls, better ventilation, and more sophisticated acoustic treatments. Recognizing your needs and planning for future growth ensures you choose the right setup—whether a simple closet or a full room—so your sound quality matches your goals.
Frequently Asked Questions
Do I need foam, blankets, or both?
Both can help, but focus on sealing gaps and treating reflection points first. Foam absorbs echo, while blankets or moving quilts can be used effectively for DIY soundproofing and reducing leaks.
Where should I place acoustic panels in a closet booth?
Place panels behind and beside your mic, especially at reflection points. Cover the door gaps and any hard surfaces facing the mic to minimize echoes and leakage.
How much treatment is enough for a small closet?
Start with panels on the back wall and behind the mic, add bass traps in corners if possible, and seal gaps around the door. You can always add more if echoes persist.
Should I treat corners, walls, the ceiling, or the door first?
Prioritize corners for bass traps, then treat the reflection points on walls. Seal the door last to prevent sound leaks. Each step builds on the last for best results.
Will a closet make my voice sound boxy or boomy?
If you treat reflections and low frequencies properly, your voice will sound tight and clear instead of hollow or boomy. Focus especially on corners and the space behind you.
Conclusion
Transforming a closet into a quiet, professional-sounding space is less about endless foam and more about smart placement, sealing gaps, and targeted treatment. Think of it as tuning a musical instrument—small tweaks make a big difference.
Next time you set up your rig, focus on where the sound goes and how to contain it. A well-treated closet isn’t just a makeshift booth; it’s your secret weapon for crisp, clear recordings in a tiny space.